
Installation? It's just a floor mat. You drop it in and go, right? That's what I thought too, until I spent an evening scrolling through Reddit threads where drivers described their mats slowly creeping toward the brake pedal. One driver wrote about shifting into neutral on the highway because their accelerator got pinned by a bunched‑up mat. Another described their mat sliding forward every time they braked, gradually bunching under the gas pedal. They thought it was minor. Then one day, the accelerator didn't come back up.
NHTSA has documented floor mat entrapment as a verified cause of unintended acceleration across multiple vehicle brands. In 2009, Toyota recalled nearly 9 million vehicles worldwide after floor mats were confirmed to trap accelerator pedals. More recently, in 2025, Lucid recalled over 4,000 all‑weather mats for the same reason—they lacked proper mechanical retention and could slide forward under normal driving conditions. GM followed with a recall of nearly 28,000 Buick Envision mats.
Turns out, "just dropping it in" is exactly how people get hurt. So let's walk through the right way to install car floor mats properly—the way that keeps them exactly where they belong, regardless of weather, mileage, or how many times your heel pivots between pedals.
Step One: Preparation
Before you even look at your new mats, you need to start with a clean slate. Remove all existing floor mats from the driver's footwell—and I mean all of them. If you've been running a cheap universal mat on top of your factory carpet mat, pull both. While you're at it, check the passenger side and rear seats too; debris and moisture can travel between positions over time.
Vacuum the exposed factory carpet thoroughly. Any dirt, sand, or dried salt underneath your new mat will do two things: first, it reduces the grip effectiveness of any anti‑slip backing; second, it acts like sandpaper under the mat, gradually wearing through both the mat and the carpet below. Pay special attention to the area directly under where the driver's heel sits—that's the highest‑pressure zone.


🔍 Step Two: Locate Your Vehicle's Anchor Points
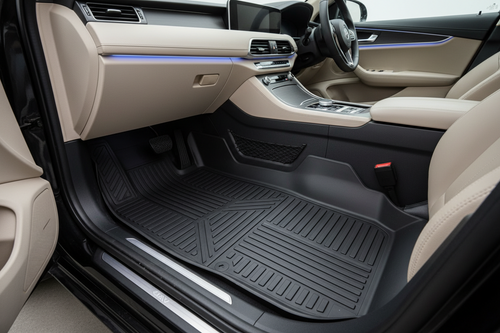
The single most important part of proper floor mat installation is engaging the retention system. A car floor mat retention system is any mechanical or friction‑based setup designed to hold a floor mat securely in position inside the footwell. These systems are not optional—NHTSA has made clear that a properly fitted, correctly anchored mat presents no safety risk, but an unsecured driver‑side mat can shift into the pedal clearance zone and obstruct brake or accelerator operation.
Most modern vehicles come with factory‑installed anchor points. These are usually small metal or plastic posts—referred to as male anchors—embedded in the driver's footwell carpet.[reference:4] Toyota, Honda, GM, Audi, and most major manufacturers use variants of this system. Anchor geometry varies between brands, which means an OEM mat from one manufacturer will not fit another vehicle's anchor posts.
How to find them: Get down at eye level with the floor carpet, right behind the brake and accelerator pedals. Look for small hooks, posts, or raised plastic clips. In many vehicles, you'll see two anchor points: one slightly left of the accelerator, another closer to the dead pedal area. If you don't see anything obvious, check your owner's manual—manufacturers often include a section on floor mat installation with diagrams of anchor locations.
🚗 Step Three: Install the Mat (The Right Way)
Now that the area is clean and you've found your anchor points, it's time to install the mat. The exact steps vary depending on your retention system, so we'll cover the most common scenarios.
OEM Hook‑and‑Anchor System
If your vehicle has factory anchor posts, your mat should have matching grommets or holes on the underside. Position the mat in the footwell, align each grommet with its corresponding anchor post, and press down firmly. In many systems—especially Toyota, Honda, and GM—you'll twist the mat slightly or push down until you hear a snap to lock it into place. The goal is zero movement: after engaging the anchors, try pulling the front edge of the mat upward with moderate hand pressure. If it lifts more than one to two centimeters, it's not properly secured.
Clip Retainers (Aftermarket)
Some vehicles don't have built‑in anchor posts, especially older models or base trim levels. In these cases, clip retainers are a common solution. Clip retainers grip the edge of the vehicle's carpet from underneath, while a hook or post on the upper side provides the attachment point for the mat's grommet. They work reliably when correctly installed, but the clip section can fracture if stepped on at an angle, so inspect them periodically.
To install clip retainers: position the mat, mark where the anchor points should go, cut small holes in the mat if it doesn't have premade grommets, insert the retainer through the hole, and press the assembly into the carpet until it locks. A cutter is usually included with the retainer kit. Make sure the car floor has sufficient padding under the carpet for the anchor to bite into.
For SedansFor SUVsFor TrucksFor EVsFor 5-Seater VehiclesFor 7-Seater Vehicles
Twist‑Lock Retainers
Twist‑lock systems are two‑piece fasteners: a base seats into the carpet, the mat sits over it, and a cap threads down through a hole in the mat to lock everything in place. These are inexpensive and widely compatible across most carpet‑floored vehicles. The mat must have a correctly sized grommet—if the hole is too large, the mat can still shift; if too small, installation risks damaging the material.
Spike‑Based Anchors
For vehicles with no OEM anchor points and carpet that won't hold clip‑style retainers, spike anchor systems use multiple angled spikes that penetrate the carpet and grip the padding below. The mat is sandwiched at the surface while the spikes splay outward beneath the carpet, resisting withdrawal. One condition applies: the carpet must have adequate sub‑padding for the spikes to achieve full penetration and hold.
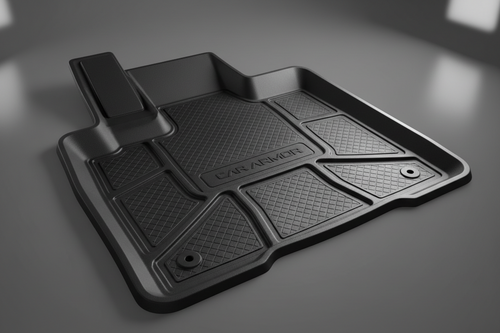
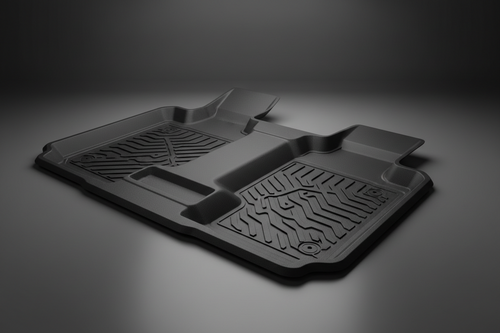
Custom‑Fit Mats with Retention Built In
The cleanest solution is a custom‑fit mat designed to work with your vehicle's exact footwell dimensions. Custom‑fit EVA or TPE mats are cut to the 3D measurements of specific vehicles, so the mat fills the footwall closely on all sides—the walls and seat base act as natural boundaries before any clip or anchor is engaged. On the mechanical side, quality custom‑fit mats include pre‑cut grommets matched to the OEM anchor positions, or provide their own retention system. For vehicles without factory anchors, Velcro backing provides a secondary friction layer.
If you're shopping for new mats, AutoMatSupply lets you filter by exact vehicle make and model, so you can be confident the retention system will actually work with your car.
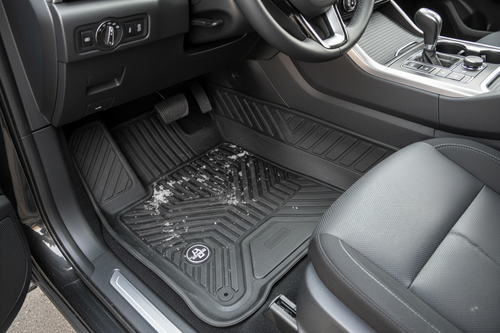
⚠️ Step Four: Pedal Clearance Test (The One Everyone Skips)
Here's the test every driver should do but almost nobody actually performs. After you've installed the mat, sit in the driver's seat and depress the brake pedal all the way to the floor. Look at where the edge of your floor mat is relative to the pedal base. The mat edge should be at least three inches away from any pedal at its maximum travel position. Now press the accelerator fully. Same rule applies. If there's any contact or the mat bunches up during pedal travel, you need different mats.
Why three inches? Because mats shift. A mat that sits two inches from the pedal today can creep forward over weeks of use, eventually entering the clearance zone where pedal obstruction begins.
NHTSA's guidance is explicit: a driver‑side floor mat that is not properly placed and secured could slip and interfere with the movement of the pedals during driving and may cause an accident.[reference:16] They recommend checking floor mat position every time you enter your vehicle. That might sound excessive, but mat movement accumulates incrementally with every pedal press. A quick glance takes two seconds.
📅 Step Five: Post‑Installation Monitoring
Your installation isn't done when you close the door. New mats sometimes shift as they settle into position, especially within the first month of use. Check your mat position weekly during this initial period. After that, monthly checks are sufficient unless you notice any movement.
The most common time for mat movement to reappear is after cleaning. You pull your mats out at the car wash, hose them down, put them back, and drive away—without re‑engaging the retention system properly. After every mat removal, repeat the installation steps: vacuum underneath, align anchors, test pedal clearance, verify no movement.
✅ Correct Installation Checklist
- 🧹 All old mats removed, carpet vacuumed
- 📍 Factory anchor points located (if equipped)
- 🔗 Mat grommets aligned with anchors, twist‑lock engaged
- 📏 Pedal clearance ≥ three inches at full travel
- 🔁 No stacking — one mat only in driver's footwell
- 🗓️ Weekly check scheduled for first month
❌ Dangerous Shortcuts
- 📦 Stacking all‑weather on top of carpet mats
- 🔩 Ignoring broken or missing retention clips
- 🚫 Skipping the after‑installation pedal test
- 🧼 Reinstalling mats incorrectly after cleaning
- 🛒 Buying universal mats with no retention system
⚠️ The One Rule You Cannot Break: Never Stack Mats
If you take away only one thing from this article, make it this: never stack two floor mats in the driver's footwell. Running an all‑weather mat on top of a carpet mat (or vice versa) raises the floor surface, defeats retention anchors, and significantly increases the risk of the mat shifting into the pedals.
NHTSA and every major automaker warn against this explicitly. Toyota's recall notice stated that floor mats should always rest on top of vehicle carpeting surface and not another floor mat or other covering. The combined height of two mats reduces pedal clearance and creates a sliding surface between the layers. It's one of the most common causes of pedal entrapment incidents reported to NHTSA.
🔧 Aftermarket Retention Solutions for Vehicles Without Factory Anchors
Not all cars have factory anchor points. Older vehicles, base trim levels, and some market configurations may have no factory anchoring system. If your vehicle falls into this category, you have several options.
Aftermarket anchor kits are available from brands like Eagle Klaw, WeatherTech, and Husky. Most kits include a small cutter to create holes in your mat if it doesn't have pre‑made grommets. The process typically takes three to five minutes per mat: cut a hole approximately two inches from the edges of the mat, insert the cap through the hole, screw it into the anchor post, and then tap the assembly into the carpet with a hammer or push firmly until it locks. Make sure the car floor has sufficient padding under the carpet at the anchor location—without adequate sub‑padding, the spike won't engage properly.
Heavy‑duty hook‑and‑loop strips (Velcro) can work as a secondary retention measure, but they are not sufficient as the sole method on the driver's side where mechanical anchoring is essential. Velcro works best as a backup.
Spiked backing is common on premium all‑weather mats. These are small raised nibs or spikes on the mat's underside that grip your carpet fibers. They work surprisingly well and last for years without degrading. The downside is they don't work on smooth factory floor pans in some trucks and work vehicles.
 AutoMatSupply
Rubber vs Carpet Car Mats: The Ultimate Showdown(Pros, Cons & What Reddit Won't Tell You)
 AutoMatSupply
Beyond WeatherTech & Husky: 12+ Floor Mat Brands Actually Loves-Are 3D Maxpider mats worth the hype?
 AutoMatSupply
3D Car Mats vs Flat Mats – Which One Actually Protects Your Car’s Floor?
🧼 Maintenance: Keeping Mats Installed Correctly Over Time
Proper installation is not a one‑time event. Mats need regular maintenance to stay safe.
- Check retention clips monthly. Clip retainers can fracture if stepped on at an angle, particularly in high‑use vehicles.
- Inspect the heel pad area. The heel pad is where the right foot rests between accelerator and brake inputs. Repeated pressure can cause an unreinforced mat to distort and shift forward.
- Clean mats properly. Remove them from the vehicle, shake off loose dirt, spray with a hose, scrub with mild soap and a brush, then rinse thoroughly. Let them air dry completely before reinstalling. Never reinstall wet mats—moisture trapped underneath leads to mold and reduced grip.
- Watch for curled edges. Any curled edges that could catch a foot entering or exiting need to be addressed.
- Replace mats when retention fails. If your mat no longer stays anchored despite correct installation, or if the anchor points themselves are damaged, replace the mat immediately.
📋 Safety Checklist Before Every Drive (From NHTSA)
NHTSA recommends checking floor mat position every time you enter your vehicle. Here's what that two‑second check should cover:
- Driver's side mat: Is it engaged with the vehicle's OEM anchor, if one exists? Can you pull the front edge upward more than one to two centimeters with light hand pressure? Is it sitting on top of another mat? (Never stack.) Is the front edge within two to three centimeters of the accelerator pedal at its furthest forward position? If yes, recheck your retention system—this is the clearance zone where pedal entrapment begins. Is the heel pad area worn thin, distorted, or curling?
- All positions: Any curled edges that could catch a foot entering or exiting? Are clips or anchors intact and properly seated? Has any mat shifted from its installed position since you last checked?
🚗 Find Mats with Proper Retention for YOUR Car → Shop Custom‑Fit Floor Mats
Sources: NHTSA recall database (Toyota 2009‑2011, Lucid 2025, GM 2025), Prime EVA retention system guide, Fitgear UK anti‑slip safety research, Reddit automotive communities, and manufacturer installation guidelines.


